Showing posts with label Being Green. Show all posts

Saturday, July 30, 2011

Feathering Our Nest With Love: Part 4 Wax On!

My patient waiting for the mailman paid off! Check out that incredible finish on our dresser! Late last week I ordered a tin of Briwax Wood Wax from their North American Mid-west Distributor. This English product, endorsed by Her Royal Majesty the Queen of England herself, is made from a blend of real beeswax and carnauba wax. According to the product’s North American website, “Briwax is designed to protect raw wood and can be applied to virtually any existing finish. Use Briwax on all woods, untreated leather, marble, concrete, metal and painted surfaces.” After priming and applying two coats of Pittsburgh Paint Ultra in Aqua Bay, I used fine grit sandpaper to distress the drawers, concentrating on corners and edges that routinely receive typical wear ‘n’ tear.

I then applied a thin coat of Original Briwax in Dark Brown to the dresser drawer, using a soft cloth. You can see the difference between a Briwax-treated drawer and an untreated drawer in the first image. (Click on the image for a larger view) Notice the aged look this gives the drawer and the weathered appearance it invokes. Difficult to believe years and years of weathering and discoloring could happen in less than 5 minutes!

After waxing all four drawers, I added “new” hardware. Both the knobs and drawer pulls were purchased at various Habitat for Humanity Restores throughout the state. The knobs were sold 8 for $1.75 (that’s $0.22 each!) and the drawer pulls were $0.50 each and still in their original packaging! Awesome deals! Awesome way to reduce and reuse and support an amazing cause!

The victim of an over-active imagination, I wanted to add a special touch to the top of our dressers that would retain the casual look of the dressers but update them with a hint of elegance. A broad border in Aqua Bay on the Bamboo painted top of the dresser was the perfect touch! (The above photo was taken before the top was sanded and wax.) This broad border was made using a ruler, a pencil, masking tape, and a fine painter’s brush. The masking tape provided a straight yet feathered edge to my border, perfect for that imperfect hand-painted look.

After sanding and waxing the body of the dresser and installing it in Jay’s closet in our bedroom, the impressive results speak for themselves.


Jay and I were both so impressed at my handiwork that we can’t wait to paint our second dresser and finish our headboard using the same techniques! It will be the first time either of us will have matching bedroom furniture! The days of hand-me-down furniture aren’t gone, they’re just Bri-waxed to a perfect polish! Yay!

Thursday, July 28, 2011

Feathering Our Nest with Love: Part 3 a.k.a. Playin' with Power!

As you can see from the above snapshots, we’ve started work on the much anticipated headboard! We picked up as many of our supplies from Habitat for Humanity Restore as possible. That awesome paneled door was a mere 25 cents! Jay gladly used his new toys to cut the door to a size we need (roughly 60 inches for a queen size bed). The door is a standard 36” wide door. We’re using two 4x4’s (5 feet in length) as the legs for our headboard. We splurged a little bit on the shelf portion of our headboard, spending $50 at the Restore. It’s a quality, unfinished piece that would have easily retailed at $175+ if we had purchased it anywhere else.

We’re keeping with the color scheme established by the dressers we’re refinishing. Pittsburgh Paints has a stunning collection of colors that inspired us. The two colors we’ve chosen to complement each other in our new bedroom are Aqua Bay, a greenish-teal inspired by the sea, and Bamboo, a delicate cream with a splash of honeyed green tea color. Both colors appear in their “Serene” Ultimate Style Collection available at Menard’s. In contrast to our dressers, Bamboo will be the primary color of this piece, with the striking Aqua Bay serving as an unexpected pop of color in very calculated places. But first the ever laborious task of priming!

Sunday, July 24, 2011

Feathering Our Nest With Love: Part One

Now that my devoted husband and I are settling into married life (2 months & counting!), we thought we'd say ta-ta to our bachelor decor ways. Gone are the days of mismatched furniture, disorganized disarray, feuding color palettes, and living out of the clean clothes baskets. Since our lovely Governor is doing his utmost to foil our plans of moving Northwards, we've decided to plow forward and do whatever we can to make our current (yet temporary) living space truly feel like home to us.

First and foremost for any newly-wedded couple: the bedroom. In a one-bedroom apartment, this space needs to be versatile and well-organized but also serene and tranquil.
We have approximately 13' x 13' to work with. This includes a closet with floor to ceiling sliding doors running along the entire eastern wall. We have an awkward 4' window in the middle of the northern wall, directly above our apartment's sole air conditioning unit. Like most apartments, our walls are painted a hazy off-white. Most of the trim and woodwork, including the monstrous closet doors, are a dark espresso veneer. Visually, here is what we have to work with:

To update our pathetic and paltry bedroom, Jay and I have started scouring the internet, sorting through our fine collection of DIY books, and keeping our eyes open for inspiration. We'd like to re-use and re-purpose whatever we can and supplement what we do have with goodies from Habitat ReStore and thrift stores whenever possible. Visually, here are our initial ideas:


T
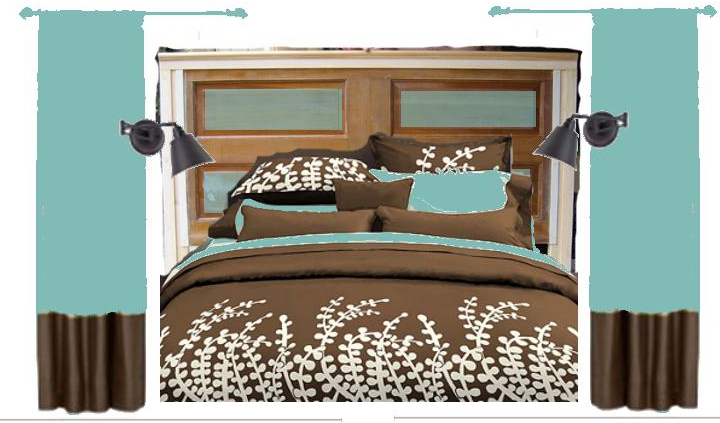
hanks to potterybarn.com and Gimp, we've been able to cobble together an inspiration board of sorts. Pottery Barn has an awesome online tool to help you visually map out your room design. We've created the above layout, switching our queen bed from the western wall to the sourthern wall, and adding in some luxury with a unique floor rug. In Gimp, we were able to play around with color and shape to design a working idea. Here's a list of some of the projects/items/ideas we'd like to pursue:
  • Create a headboard out of re-purposed vintage door
  • Find His & Her gooseneck or adjustable wall-mounted reading lamps for bedside
  • Re-configure closets for more efficient use of storage space
  • Re-finish the old dressers Jay has had since he was a kid
  • Enhance the window to allow for natural light yet still provide privacy
  • Disguise the Goliath-size closet doors
  • Provide me with an intimate and inviting workspace
  • Create a serene, tranquil, and stress-free sleeping environment that uses a canopy of sorts to block out the rest of the room for when we just want to "get away from it all"
My plan is to keep y'all posted with daily updates on our progress. Some of these projects are simple Crafty-Quick-Fixes, while other projects may require several days to reach completion. This adventure Jay and I are about to embark upon will be great practice for when we move to a more permanent and North-Eastern-ly location. Blogging about our triumphs and especially our tribulations will help regulate my perfectionism too!

I'm itchin' to get started! Stayed tuned for many updates to come!

Monday, June 28, 2010

Crafty Quick Fix: Picture-Perfect Chalkboard

I'm one of those overly-organized people who write everything down lest she forgets. Post-it notes, To-do lists, and magazine clippings can be found all over the house, in my purse, on my fridge, all over my desk... Sometimes those little reminders just aren't enough. They get buried or get lost and you're stuck at the grocery store trying to remember those three silly items you came there to get! This Picture-Perfect Chalkboard helps remedy those pesky situations. Now that quick grocery list stares you in the face every time you walk by this beautiful work of art. It also works as a functional yet funky Family Message Board. Jot a love note to your sweetie, or remind him to take out the trash!

Before:


After:

A
lways on the lookout for ways to re-use thrift store finds, I crafted this simple project out of a $2 frame. After removing the glass, I stripped the varnished and stained wood with this helpful new product I found: Citristrip. According to the manufacturer, this stripping product is safer to use and better for the environment because it lacks the harsh chemicals other strippers depend on. I also personally recommend Citristrip because it's gel form makes simple work out of stripping and provides excellent coverage on raised surfaces like the beveled frame I re-purposed. After two coats of "Aladdin's Wish" paint from Hardware Hank, and a quick coat of chalkboard spray paint from Krylon on a piece of paneling cut to the size of the frame, you're all set to assemble a fabulous new place to jot down your daily reminders!

P.S. Check out my collection of adorable Owl trivets! I just love that vintage charm!

Wednesday, June 24, 2009

Get Lost!: At the Farmer's Market


Gorgeous sunny days and enthralling summer thunderstorms mean only one thing: ideal weather for perfecting produce. And the best place to purchase the best local produce is at your local farmer's market.
You'd be surprised at the bounty of goods available at most farmer's markets. Sure, fresh fruits and veggies are expected, but anything from fresh baked goods to locally produced honey and honey-made products are usually available for purchase. Even gourmet dog treats and hand milled goats milk soap can be purchased at farmer's markets!
Although its a bit early in the season for most fruit and vegetable delights, check out PickYourOwn.org for harvest times in your area. My boyfriend can't wait for the local sweet bell pepper harvest to ripen. We're already collecting recipes to try out with the freshest local ingredients available. I encourage you to let the fruits and veggies of the season inspire your next menu. Not only is it cheaper to purchase produce when its in season, but you're also supporting the local economy and you're providing your family with a healthier, fresher option.
F
or some simply yummy recipe ideas, several reads are now on the market specifically written with the farmer's market shopper in mind. We've been going green and saving a little money by using some of the titles available at our local library. Better Homes and Gardens has a few older books available, but one book I'd love to get my hands on is "Fresh from the Farmer's Market" by Janet Fletcher. Some of the reviews on Amazon claim her recipes are a little too restrantry and sophisticated, but I'd love to read what shopping tips she provides.

Monday, June 15, 2009

Salvaged Parts: Deconstructed Jewelry

If you're looking for a quirky, low cost way to spice up your cards or add a little bling to your scrapbook pages, hit the thrift store, check out some rummage sales, or rifle through the closet of a family member. Old, unwanted, or broken jewelry can quickly and easily be salvaged for usable charms, chains, and beads. I especially love deconstructing vintage earrings - that way I can make two identical cards using the same design element!
Just look at the treasure trove of inspiring goodies I purchased this weekend from my aunt who sells vintage jewelry. Ideas are already swirling in my head on how to design cards and gift tags inspired by my salvaged parts. Stay tuned to see what I come up with!

Sunday, May 10, 2009

Happy Mother's Day!

"No one in the world can take the place of your mother. Right or wrong, from her viewpoint you are always right. She may scold you for little things, but never for the big ones." - Harry S. Truman


I made sure to get started on my Mother's Day gift to my mom early. I even let her pick out the fabric for it, so I was sure it would appeal to her. I found a super simple yet super practical idea in Martha Stewart's Good Things for Organizing for making a fabric plastic bag organizer.

This unique design is a fashionable alternative to some of the other options on the market. Unlike it's counterparts available in stores and online, making your own allows you to customize the design to suit your kitchen's or bathroom's color scheme and decor. I embellished what Martha designed by using satin ribbon in a contrasting color at the top in addition to the bias tape. You have the option of using wider bias tape and wider ribbon too. Elastic gets threaded through a loop of fabric at the bottom so that the organizer acts as a bag dispenser only when you give a tug on the bottom bag. Ingenious.

Although everyone in my family is making an effort to utilize reusable fabric bags for our shopping needs, plastic bags still find a way to multiply like bunnies in the back of our closets and in the bottom of our kitchen drawers when we're not looking. Now we have an eye-catching way to save them up for recycling or for reuse. They can cleverly hang in the kitchen, hang in the bathroom, or hide away in a closet. What Mother wouldn't want something as clever as this?!?

Friday, May 8, 2009

Craft Quick Fix: Mail Holder

When you can't find quite what you're looking for in stores when it comes to home decor, why not design your own? Found at a local thrift store, this unfinished particle board box was probably a homemade donation. More than likely, its creator intended it to be used as a napkin holder, but the slots cut into two of its sides make for a great mail holder in our hallway instead.


Because it was unfinished, we could design and decorate the box any which way we pleased. Using craft paint in a mushroom brown taupe and dark mocha, this easy project was completed overnight. Contact paper was used to create a stencil and a spray lacquer gives it a protective coat and lustrous shine. Simple tricks and a little patience can turn any simple project into a piece you may come to cherish!

Saturday, April 18, 2009

Inspiration: Thrift Stores

With the world faced with economic recession and unemployment rates on the rise (with even your favorite blogger searching for one of those non-existent jobs!), any opportunity to save a penny or two is welcomed with open arms. That's why I'm advocating to all of you to run (don't walk!) to your nearest community thrift store! Not only can you find some amazing bargains, incredible one-of-a-kind items, and hilarious nostalgia from yesteryear, you'll also be helping a worthy cause and the positive missions of non-profit organizations with your purchases! It's also one of the greenest ways to shop since you're reducing the production of new products, reusing new-to-you items, and recycling usable materials with the donations of your gently used items. Remember: one person's trash is another person's treasure!

Just check out some of these great thrift store finds I've recently run across:

1) I'm sure you recognize that big guy in back from a previous post about Inspiration. He's my Owl Coin Bank. And he's now watching over the small flock of owls I've found at some local thrift stores! Each one is distinct and special in their own right. And not a single one of them cost me more than $0.99 a piece! These will some day look great scattered among books on built-in shelves in a living room or personal library. (A girl can dream, can't she?)


2) This perfect set of brand new dishes was purchased for only $10 from Goodwill. Stores like Target and Kohl's often donate unsold seasonal or returned merchandise which are then sold at incredibly reduced prices. These will look great in a future dining room or on display in a modern kitchen.

3) This smattering of matching frames was all purchased for under $12.00 at a Goodwill. Sizes range from Wallet to 8x10 and prices ranged from $0.49 to $1.99 a piece. Sometimes it really pays to scour thrift stores for these one-in-a-million opportunities. I especially love the rich teal stain of the wood. It will make a great accent color in our living room. The frames can be used for photos or remnants of decorative fabric or even swatches of coordinating scrapbook paper or wallpaper. Endless possibilities!


4) One valuable lesson thrift store shopping has taught me, is that nothing is strictly as it appears and all things have untapped potential. When it was sitting on the shelf, this homemade welded wonder took a second glance to realize what a find this was! Picture this: an intimate dinner party with a few of your close friends, laughing over plates of Chianti-marinaded pot roast, and sharing stories by candlelight - candlelight that is being provided by this funky chandelier. Those six rings could contain glass-blown votive holders and be hung from the ceiling with a coordinating steel chain or placed on the table as a casual centerpiece. We've also considered using this in the kitchen as a pot rack hung from the ceiling. There's nothing like repurposing thrift store bargains!


And 5) This unusual find really caught the eye of my boyfriend, and no wonder! It's a candle wall sconce that uses a large magnifying glass to magnify the illumination of the single candle's small flame. How unique! This solid brass piece is one of two that I purchased as part of an early birthday gift for Jason. Once we find a proper home for them, we might silver leaf them to match our tastes and decor better. We love the eclectic-ness of them and are looking forward to using them in the near future!

Hope you found these thrift store discoveries just as inspiring as I have! Now run out to your nearest thrift store, Goodwill, or Salvation Army and happy bargain hunting!

Saturday, February 28, 2009

Softie: Ollie the Owl

Any proper student of Classical Studies would of course have a little obsession with owls. As a symbol of the goddess Athena, owls appreared on ancient greek coins and were a popular representation of wisdom in the Classical world. Those ancients really knew their stuff. These timeless little creatures are once again a huge trend in crafts, fabrics, and home decor.
Becoming more adventurous in my softie making, I set out to design my own full-sized softie and gave him the name "Ollie", named after the owl that visits the backyard of my parents' house and softly hoots me to sleep sometimes. A fabulous 70s-inspired floral fabric in black, cream, grey, and maroon is anchored by black & cream felt, and a cool grey corduroy. Once again, this piece is handsewn (no machine!) but this time uses Fairfield 100% Bamboo Nature-Fil Stuffing. I highly reccommend this low cost earth-friendly alternative to traditional polyester stuffing. It's soft, lush, user-friendly, and naturally anti-bacterial.
Overall, I'm pretty pleased with the results of this little fella. I included the wings as a last minute addition and they turn out to be my favorite element of Ollie. If I ever use this pattern again, I'd like to sew the wings "in to" the owl body instead of "on to" the owl body. I would get much cleaner results...but that's just the perfectionist in me! :)