Friday, July 2, 2010

Strawberry Hazelnut Splendor

Just in time for summer picnics and Fourth of July parties! I've doctored the Raspberry Delights recipe from Taste of Home's "Best Summer Desserts 2010" magazine and created a heartier, healthier dessert using whole wheat flour, egg whites and organic strawberry preserve. I've also made the addition of our favorite cream cheese frosting as a rich, flavorful swirl on top.

Variations on this recipe abound! Try any of your favorite fruit preserves or homemade jams for a delicious spin. Combine two or more fruits like strawberry and raspberry for a berry-tastic treat! Experiment with your families favorite nut flavors. Hickory nuts, walnuts, almonds, even sans nuts could all enhance the flavor of this cookie bar! I know I'll be trying a butter streusel topping sprinkled over the next Strawberry Hazelnut Splendor I make for my family!

Strawberry Hazelnut Splendor

Ingredients:
1 c Butter, softened
1 c Sugar
2 Eggs, egg-whites only
1/2 c Whole Wheat Flour
1 1/2 c All Purpose Flour
1 c chopped Hazelnuts
1 c organic Strawberry Preserve

Directions:
1. Cream butter and sugar in a large bowl until fluffy. Beat in egg whites. Gradually add flours and mix well. Stir in nuts until thoroughly blended.

2. Spread half of the batter into a lightly greased 13x9 baking pan. (Note: Don't be afraid to get your hands dirty! Spreading with your fingers may work easier than with a spatula.) Spread strawberry preserve over the entire surface of the pan. Drop remaining dough over strawberries in small dollops, in a random, haphazard way. Leave random spots of strawberry preserve exposed.

3. Bake at 350 degrees F for 30-35 minutes or until top is golden brown. Let cool. Drizzle with your favorite icing or leave plain. Cut into bars and serve up the splendor!

Monday, June 28, 2010

Crafty Quick Fix: Picture-Perfect Chalkboard

I'm one of those overly-organized people who write everything down lest she forgets. Post-it notes, To-do lists, and magazine clippings can be found all over the house, in my purse, on my fridge, all over my desk... Sometimes those little reminders just aren't enough. They get buried or get lost and you're stuck at the grocery store trying to remember those three silly items you came there to get! This Picture-Perfect Chalkboard helps remedy those pesky situations. Now that quick grocery list stares you in the face every time you walk by this beautiful work of art. It also works as a functional yet funky Family Message Board. Jot a love note to your sweetie, or remind him to take out the trash!

Before:


After:

A
lways on the lookout for ways to re-use thrift store finds, I crafted this simple project out of a $2 frame. After removing the glass, I stripped the varnished and stained wood with this helpful new product I found: Citristrip. According to the manufacturer, this stripping product is safer to use and better for the environment because it lacks the harsh chemicals other strippers depend on. I also personally recommend Citristrip because it's gel form makes simple work out of stripping and provides excellent coverage on raised surfaces like the beveled frame I re-purposed. After two coats of "Aladdin's Wish" paint from Hardware Hank, and a quick coat of chalkboard spray paint from Krylon on a piece of paneling cut to the size of the frame, you're all set to assemble a fabulous new place to jot down your daily reminders!

P.S. Check out my collection of adorable Owl trivets! I just love that vintage charm!

Friday, April 30, 2010

Friday's Feisty Feast: Garden Veggie Pizza


For a healthy luncheon at work, I dug out an enticing recipe I had squirreled away for just such an occasion. After discovering the recipe in Taste of Home's "The Market Fresh Cookbook" edited by Jennifer Olski, I knew this fresh veggie pizza would make a great contribution to a potluck or provide the perfect finger food for a summer picnic or camping trip. This simple recipe was such a hit, I'll be making it every chance I get! Plus, the ingredient list is so versatile, I'll be busy developing new combinations and flavors to try! Look for a Greek-style Veggie Pizza soon!

Garden Veggie Pizza

Ingredients:

8 oz. tube seamless Crescent Rolls
8 oz. reduced-fat or fat-free Cream Cheese (Tip: Support local businesses by checking labels to see where your products were produced!)
1 packet of Ranch salad dressing mix
2 Tablespoons fat-free Milk
1/2 cup chopped fresh Broccoli
1/2 cup chopped fresh Cauliflower
1/2 cup chopped fresh Carrots
1/2 cup chopped fresh Green Pepper
1 small package Grape Tomatoes

Directions:

Preheat oven to 375 degrees F. Unroll crescent dough into 13x9x2 inch baking pan, coated with nonstick cooking spray. Bake for 11-13 minutes or until golden brown. Check for air bubbles during the baking processing and pierce any with a fork. Remove from oven and allow to cool completely.

Meanwhile, wash and chop all of your veggies. Grape tomatoes should remain whole. Set aside.

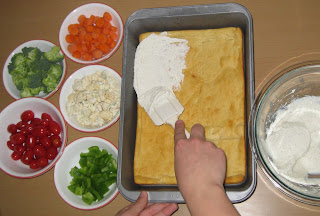
In a small mixing bowl, beat cheese, dressing mix, and milk until a smooth consistency is reached. Spread over cooled crust. (Tip: Extra ranch cream cheese spread makes for an indulgent dip for any leftover veggies you may have!)

Sprinkle cheese-coated crust with chopped veggies. Cover and refrigerate before serving. Slice with a pizza cutter and enjoy!

Friday, April 16, 2010

After a manic match of mayhem on the roller derby track, it's nice to come home to some awesome pain and stress relief. As a gift, I made these therapeutic rice bags for my boyfriend's sister, Mistress Miter Saw, a sassy and spunky member of the Fox Cityz Foxz and reigning British World Champion of Pillow Fights. When she's not kicking butt, she's kicking back and using these punkified rice bags to relax those derby-inspired aches and pains away.

Using the same modified pattern I borrowed from Sew, Mama, Sew for the October 2nd, 2009 post Crafting for a Cause: Cool Rice Therapy Bags, I opted rocker chic fabric for this rocker chick and incorporated punk princess pink accents. (Reduce, Reuse, Recycle Alert: Notice the scraps from the quilt I made last summer!) I also made a matching soothing eye mask using a soft pink fleece liner whip-stitched with pink embroidery floss. You can find a template pattern for such an eye mask here.

Whether you're recovering from a day of body slams and elbow jabs on the fierce derby track, or you're just struggling with the everyday aches and pains of a life on the go, these therapeutic rice bags offer soothing comfort and make a great gift for the roller derby princess in your life!

Check out the Women's Flat Track Derby Association on how you can locate, join, or support a local derby in your area!

Wednesday, April 14, 2010

Design Medley: Retro Teal & Olive


Nothing shouts retro 70's mod design louder than the color scheme of teal blue and olive green. (Well, maybe vivid orange and bold brown do, but we'll save that for another design medley post!) Just picture the 1970's wallpaper in your parents' kitchen, or the old avocado green Frigidaire rattling along in your basement. Now anchored by a supporting cast of creamy white and recycled brown, these vintage colors take on a bold new meaning. Check out some of the whimsical cards inspired by this design medley!

Up top, an edgy yet simple thank-you card uses mixed textures to showcase the versatility of these colors. The raggedness of the distressed olive background is balanced by the delicate smoothness of the woven teal ribbon on the left. Yet the raggedness and distressed-look of this card is reestablished by the unraveling fringed fabric of the center teal blue "thank you" motif. A satin ribbon flower continues the unconventionality of this card in an unexpected color.

The card at the right uses an awkward pre-fab card as it's base. Blue argyle paper and unique green ribbon architecturally divide the bubbly space of this card. A floral medallion of paper, felt, and mesh in browns, golds, and greens is fused together with a retro, square blue brad. Separate, these design elements would strain the eye and be considered unattractive. But together they form an alluring montage that draws the eye in and encourages the eye to explore and appreciate the colors, shapes, and textures as a whole. (Am I starting to sound like a freakin' art critic or what?!?!) Bottom line: DON'T be scared of making something ugly. The results just might surprise you!

This final card is my favorite from the group. It is pure whimsy. Designed to celebrate an engagement, a wedding, or an anniversary, this card ignores conventional elegance and drastically re-writes the rules on "pretty". Teal blue and olive green elements explode all over this card. Buttons, embroidery floss, fabric, ink, ribbon, and bejeweled charms scatter across the page in a billowing display of retro opulence and distressed home-made enchantment. Delightful!

P.S. I practiced some of my photo editing and image design on GIMP for this post. That's where all the overlaid flourishes and graphic embellishments came from. Hope you like it!

Friday, April 9, 2010

Friday's Feisty Feast: Spring Asparagus Medley

Spring has arrived with its sudden rain showers, blooming daffodils, and tasty asparagus! Here's my asparagus-inspired adaptation of a recipe from the book "The Little Guides: Pasta" copyright 1999. The crisp, green of the fresh asparagus in my version makes for a grand splash of color next to the vibrant red tomatoes and pimento. The original recipe uses scallops and Penne, but Gemelli pasta and asparagus gives this dish a nice twist. Enjoy!

Spring Asparagus Medley with Pasta


Ingredients:
1 lb. fresh Asparagus
8 oz. Gemelli or other dried pasta
4 tsp. minced Garlic (We love Christopher Ranch!)
2 T Olive Oil
½ c. Red Cooking Wine
2 tsp. Cornstarch
2 lb. Roma Tomatoes, finely chopped
4 oz. diced Pimento (Check your grocer’s condiment aisle!)
3 T dried Italian Seasoning
½ tsp Salt
¼ tsp crushed Red Pepper flakes
Topping: grated Parmesan cheese (optional)

Directions:
Prepare pasta according to package directions. Cook to al dente. Drain.

Prepare asparagus. Bring a large saucepan of water to boil. Meanwhile, snap off woody base of asparagus and discard. Slice into 1 1/2 inch pieces. Add asparagus to boiling water for 8-10 minutes or until tender. Remove from heat and drain.

In a large frying pan or stove top wok, mix together red cooking wine and cornstarch. Add in asparagus, minced garlic, chopped tomatoes, diced pimento, Italian seasoning, salt, and red pepper flakes. Cook on medium heat until bubbles start to form and mixture has thickened in texture. Reduce heat to low for 5 minutes. Toss in cooked pasta until well mixed. Serve immediately and top with grated Parmesan cheese if desired. Serves 4.