Showing posts with label Organization. Show all posts

Sunday, July 24, 2011

Feathering Our Nest With Love: Part One

Now that my devoted husband and I are settling into married life (2 months & counting!), we thought we'd say ta-ta to our bachelor decor ways. Gone are the days of mismatched furniture, disorganized disarray, feuding color palettes, and living out of the clean clothes baskets. Since our lovely Governor is doing his utmost to foil our plans of moving Northwards, we've decided to plow forward and do whatever we can to make our current (yet temporary) living space truly feel like home to us.

First and foremost for any newly-wedded couple: the bedroom. In a one-bedroom apartment, this space needs to be versatile and well-organized but also serene and tranquil.
We have approximately 13' x 13' to work with. This includes a closet with floor to ceiling sliding doors running along the entire eastern wall. We have an awkward 4' window in the middle of the northern wall, directly above our apartment's sole air conditioning unit. Like most apartments, our walls are painted a hazy off-white. Most of the trim and woodwork, including the monstrous closet doors, are a dark espresso veneer. Visually, here is what we have to work with:

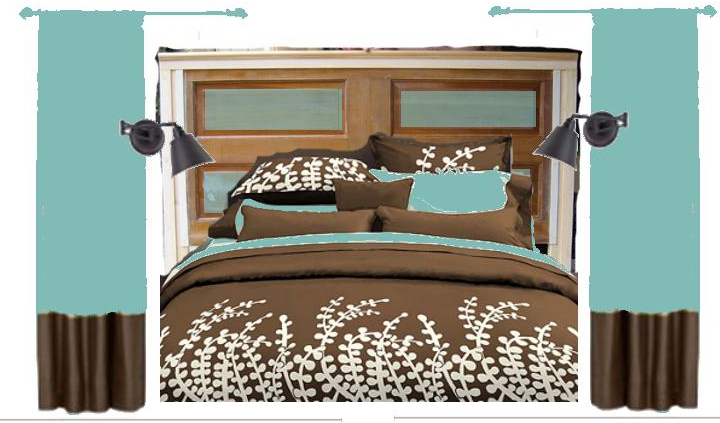
To update our pathetic and paltry bedroom, Jay and I have started scouring the internet, sorting through our fine collection of DIY books, and keeping our eyes open for inspiration. We'd like to re-use and re-purpose whatever we can and supplement what we do have with goodies from Habitat ReStore and thrift stores whenever possible. Visually, here are our initial ideas:


T
hanks to potterybarn.com and Gimp, we've been able to cobble together an inspiration board of sorts. Pottery Barn has an awesome online tool to help you visually map out your room design. We've created the above layout, switching our queen bed from the western wall to the sourthern wall, and adding in some luxury with a unique floor rug. In Gimp, we were able to play around with color and shape to design a working idea. Here's a list of some of the projects/items/ideas we'd like to pursue:
  • Create a headboard out of re-purposed vintage door
  • Find His & Her gooseneck or adjustable wall-mounted reading lamps for bedside
  • Re-configure closets for more efficient use of storage space
  • Re-finish the old dressers Jay has had since he was a kid
  • Enhance the window to allow for natural light yet still provide privacy
  • Disguise the Goliath-size closet doors
  • Provide me with an intimate and inviting workspace
  • Create a serene, tranquil, and stress-free sleeping environment that uses a canopy of sorts to block out the rest of the room for when we just want to "get away from it all"
My plan is to keep y'all posted with daily updates on our progress. Some of these projects are simple Crafty-Quick-Fixes, while other projects may require several days to reach completion. This adventure Jay and I are about to embark upon will be great practice for when we move to a more permanent and North-Eastern-ly location. Blogging about our triumphs and especially our tribulations will help regulate my perfectionism too!

I'm itchin' to get started! Stayed tuned for many updates to come!

Tuesday, October 13, 2009

Idea Journal = Instant Inspiration

If you're anything like me, you read a magazine or browse a catalog and inevitably find tons of inspiring projects or home decor ideas you'd love to try someday. You tear out or photocopy the items or articles you like the most and squirrel them away in random places around the house. Or even worse, you save the entire catalog or magazine in fear of besmirching it's integrity and the inspiration it contains.

Stop all of that silly nonsense and buy yourself a blank journal. I prefer the orderliness of a lined journal, but get yourself whatever is most functional for you. Gather up all of those random clippings and copies and determine any major themes among them. For me, it's Home Decor Ideas, Holidays, Special Occasions, and Gift Ideas, but for you it could be more specific like Color Ideas and Fabric Samples for the Living Room or Garden Tips or Anniversary Vacation Destinations. Now make tabs for each of your categories by placing same-shaped stickers back-to-back on the edge of a journal page. Space these tabs out throughout your journal and evenly down the side edge of the journal.


Now start pasting in your fabulous articles and pictures, leaving plenty of room to jot down notes. Record your initial reactions or ideas on how to take the project and make it better with your own special touches. And no need to do this all in one day. I continually add to my Idea Journal and use long car rides to do any of the note jotting I need to do.

This is a great way to always have ideas at the ready and to keep control on that inescapable creative clutter!

Tuesday, September 29, 2009

Funky Fabric Project Portfolio & Blog Journal

(Click on Photo to Enlarge Image)
Dissatisfied with some of the craft and office supplies available on the market, I seized the opportunity to design my very own, functional Project Portfolio & Blog Journal. I needed an organized space to store ideas, jot down brainstorms, and keep my blog running on schedule (or try to at least). And ever the design diva, this scheme needed to be a stylish one as well!

Here's a short summary of how the "Funky Fabric Project Portfolio & Blog Journal" was created. Check out the corresponding photos too!
  1. 1" x 12" strips of coordinating fabrics are sewn together in a random, alternating pattern to fit the length of the anticipated binder.
  2. Cut thick corrugated cardboard or corrugated plastic as firm center for the binder. Using a bright hued duct tape, adhere two 8 1/2" x 11" corrugated sheets with a 1" x 11" corrugated strip running down the center.
  3. Sew two 6 1/2" x 11" solid colored panels to the ends of the sewn strips. Add velcro closures if desired.
  4. Add coordinating pockets in contrasting fabrics to the left side panel.
  5. Pound two grommets near the top of the binder. Lace with ribbon or embroidery floss and secure a small calender or "To Do List".
  6. Finish off by adding a composition notebook and commence with project planning and blog scheduling!

Friday, September 25, 2009

Crafty Quick Fix: Fabric Storage

Anyone who claims the title of "craft-a-holic", finds themselves casually scouring the remnant bins and clearance racks of craft stores, looking for amazing deals and items to inspire future projects. While its lucky to save money and always be looking ahead to your next project, you still have to find room to store all of those fabric remnants and leftovers from past projects. Storage is a difficult premise for any craft-a-holic, but especially so for an apartment-dwelling one! (For a real challenge, try it in a single bedroom apartment with a roommate and a cat like I do!)

Solution: Purchase a shoe organizer to hang in a closet. Inexpensive yet sturdy, this organizer cost less than $10 and really serves it purpose well. I utilize the bottom boot-size cubby spaces as a colorized miscellaneous fabric catch-all. The upper portion, with shoe-size cubby holes, is the perfect spot to store specific materials for specific projects, like dyes to make custom curtains or fabric & supplies to make plastic bag organizers for a non-profit group.

Tuesday, September 15, 2009

99 Spools of Ribbon on the Wall...


After a gracious gift of spools 'n spools of ribbon from my aunt, I needed a functional technique to store my cherished craft embellishment. Why not make it stylish storage as well?!?

With the clever help of my handy boyfriend, we designed this 2 foot x 3 foot freestanding storage rack for my collection of ribbon spools. Removable dowels hold the spools in place, allowing me to add more ribbon as I acquire it - much to my roommate's chagrin! My boyfriend lovingly constructed this piece for me on our apartment's tiny balcony. What a talented guy!

By using Minwax Water-Based Wood Stain in Island Water, the natural grain of the wood shines through, unhindered by the opaqueness of paint, and the dazzling blue hue makes it a welcome addition to any room in our home. Currently, it rests on a low bookshelf in our hallway, but we specifically designed it to be wall-mounted if space ever became a limited resource for us.

Thursday, March 12, 2009

Crafty Quick Fix: Jewelry Organizer


One of the many inspiring ideas I've found while using the website Craftster proved to be an amazingly easy and amazingly helpful one! And pretty stylish too! Following a tutorial provided by ModCloth (follow link), I created this nifty way to organize, store, and display my jewelry. The frame is 15"x15" and was purchased for only $5 at TJ Maxx. I had to disassemble it and throw out the ugly safari themed art print that came with it, but the effort proved fruitful. The asian inspired brocade is from JoAnn's. It complements the gold and chestnut tones of the frame. Common pearl-headed pins keep the jewelry in place with the help of a polyester foam inset which the fabric and frame hold in place. It took under 15 minutes and under $15 to create.