Saturday, July 30, 2011

Feathering Our Nest With Love: Part 4 Wax On!

My patient waiting for the mailman paid off! Check out that incredible finish on our dresser! Late last week I ordered a tin of Briwax Wood Wax from their North American Mid-west Distributor. This English product, endorsed by Her Royal Majesty the Queen of England herself, is made from a blend of real beeswax and carnauba wax. According to the product’s North American website, “Briwax is designed to protect raw wood and can be applied to virtually any existing finish. Use Briwax on all woods, untreated leather, marble, concrete, metal and painted surfaces.” After priming and applying two coats of Pittsburgh Paint Ultra in Aqua Bay, I used fine grit sandpaper to distress the drawers, concentrating on corners and edges that routinely receive typical wear ‘n’ tear.

I then applied a thin coat of Original Briwax in Dark Brown to the dresser drawer, using a soft cloth. You can see the difference between a Briwax-treated drawer and an untreated drawer in the first image. (Click on the image for a larger view) Notice the aged look this gives the drawer and the weathered appearance it invokes. Difficult to believe years and years of weathering and discoloring could happen in less than 5 minutes!

After waxing all four drawers, I added “new” hardware. Both the knobs and drawer pulls were purchased at various Habitat for Humanity Restores throughout the state. The knobs were sold 8 for $1.75 (that’s $0.22 each!) and the drawer pulls were $0.50 each and still in their original packaging! Awesome deals! Awesome way to reduce and reuse and support an amazing cause!

The victim of an over-active imagination, I wanted to add a special touch to the top of our dressers that would retain the casual look of the dressers but update them with a hint of elegance. A broad border in Aqua Bay on the Bamboo painted top of the dresser was the perfect touch! (The above photo was taken before the top was sanded and wax.) This broad border was made using a ruler, a pencil, masking tape, and a fine painter’s brush. The masking tape provided a straight yet feathered edge to my border, perfect for that imperfect hand-painted look.

After sanding and waxing the body of the dresser and installing it in Jay’s closet in our bedroom, the impressive results speak for themselves.


Jay and I were both so impressed at my handiwork that we can’t wait to paint our second dresser and finish our headboard using the same techniques! It will be the first time either of us will have matching bedroom furniture! The days of hand-me-down furniture aren’t gone, they’re just Bri-waxed to a perfect polish! Yay!

Thursday, July 28, 2011

Feathering Our Nest with Love: Part 3 a.k.a. Playin' with Power!

As you can see from the above snapshots, we’ve started work on the much anticipated headboard! We picked up as many of our supplies from Habitat for Humanity Restore as possible. That awesome paneled door was a mere 25 cents! Jay gladly used his new toys to cut the door to a size we need (roughly 60 inches for a queen size bed). The door is a standard 36” wide door. We’re using two 4x4’s (5 feet in length) as the legs for our headboard. We splurged a little bit on the shelf portion of our headboard, spending $50 at the Restore. It’s a quality, unfinished piece that would have easily retailed at $175+ if we had purchased it anywhere else.

We’re keeping with the color scheme established by the dressers we’re refinishing. Pittsburgh Paints has a stunning collection of colors that inspired us. The two colors we’ve chosen to complement each other in our new bedroom are Aqua Bay, a greenish-teal inspired by the sea, and Bamboo, a delicate cream with a splash of honeyed green tea color. Both colors appear in their “Serene” Ultimate Style Collection available at Menard’s. In contrast to our dressers, Bamboo will be the primary color of this piece, with the striking Aqua Bay serving as an unexpected pop of color in very calculated places. But first the ever laborious task of priming!

Monday, July 25, 2011

Feathering Our Nest With Love: Part 2 & a Crafty Quick Fix!

We've surged full steam ahead on making over our bedroom! Despite the heat and the handicap of living in small apartment with very limited workspace, we've made quite a bit of progress! Jay is thrilled because he's gotten to use some new power tools we received as wedding gifts and I'm super excited to get a paintbrush back in my hands!

Here's a quick preview of some of our progress:

Removed all the hardware from Jay's tall dresser. Helpful tip: Use duct tape to label the lids of re-used plastic yogurt containers. Store any loose hardware you may need again in these containers. Write the name of the project on the duct (and if you're anything like me, the date too! You might have more than one project going at once!)


Primed all the drawers and the dresser itself with Zinsser. The primer I chose purportedly adheres to painted and finished metal, wood, masonry, etc. without the need for sanding. This snapshot is the top of the dresser after one coat.
After two coats of primer (with thorough drying time), I got to add my first coat of real paint! Our color of choice: Aqua Bay by Pittsburgh Paints. We have an exciting finish to add over top of the Aqua Bay paint, but we're anxiously awaiting it's arrival from the postman! Stay tuned!!!

And as promised, a crafty quick fix perfect for any living space!

Crafty Quick Fix: DIY Privacy Fabric Window Clings

Achieve a comforting sense of privacy while letting in the natural light! This project is perfect for apartment dwellers or anyone looking for an inexpensive and removable solution.

Supplies:
White Cotton Fabric, Scissors, Ruler or Tape Measure, Iron, Plastic storage bin, Spray Starch

Step 1: Assemble supplies (Image A)

Step 2: Measure the width of your selected window. (Image B) Choose how much of the actual window you want to cover. Since our window contains two panes of 27”, we decided to cover the bottom 27 square inches of each pane. This allows unfiltered light through the top portion of the window, while still providing plenty of privacy from the lower portion. (We have blinds we can lower if we ever want to reduce the level of light in the room!)

Step 3: Clean your window with glass cleaner. We like Seventh Generation Free & Clear Glass and Surface Cleaner!

Step 4: Cut your white cotton fabric to the appropriate size to fit your window. Since I need two 27” squares for my window, I’ve resorted to the old origami trick of folding a right triangle to achieve my square! (Image C) Iron out any wrinkles. You want your fabric as wrinkle-free as possible.

Step 5: Using your plastic storage bin to protect your work surfaces, gently begin dousing your fabric with spray starch. (Image D) Use your spray starch as directed, giving the fabric a good soaking.

Step 6: Once your fabric is thoroughly moist with starch, hang on your clean window pane. Beginning at the top, gently smooth out any wrinkles. Continue to spray your fabric with starch to encourage adhesion. Once all of the initial wrinkles have been smoothed out, apply a thorough coat of starch to the entire fabric. (Image E)

Step 7: Repeat steps 4 through 6 for any additional panes you wish to cover. Rinse your hands, wash out your plastic bin, and revel in your privacy! Image F is a snapshot of our window from the outside at night. The left window pane is completed and the right pane jealously awaits it’s turn!

Tomorrow I'll have updates on the progress to our DIY headboard and Jay's quality time with his new toys!

Sunday, July 24, 2011

Feathering Our Nest With Love: Part One

Now that my devoted husband and I are settling into married life (2 months & counting!), we thought we'd say ta-ta to our bachelor decor ways. Gone are the days of mismatched furniture, disorganized disarray, feuding color palettes, and living out of the clean clothes baskets. Since our lovely Governor is doing his utmost to foil our plans of moving Northwards, we've decided to plow forward and do whatever we can to make our current (yet temporary) living space truly feel like home to us.

First and foremost for any newly-wedded couple: the bedroom. In a one-bedroom apartment, this space needs to be versatile and well-organized but also serene and tranquil.
We have approximately 13' x 13' to work with. This includes a closet with floor to ceiling sliding doors running along the entire eastern wall. We have an awkward 4' window in the middle of the northern wall, directly above our apartment's sole air conditioning unit. Like most apartments, our walls are painted a hazy off-white. Most of the trim and woodwork, including the monstrous closet doors, are a dark espresso veneer. Visually, here is what we have to work with:

To update our pathetic and paltry bedroom, Jay and I have started scouring the internet, sorting through our fine collection of DIY books, and keeping our eyes open for inspiration. We'd like to re-use and re-purpose whatever we can and supplement what we do have with goodies from Habitat ReStore and thrift stores whenever possible. Visually, here are our initial ideas:


T
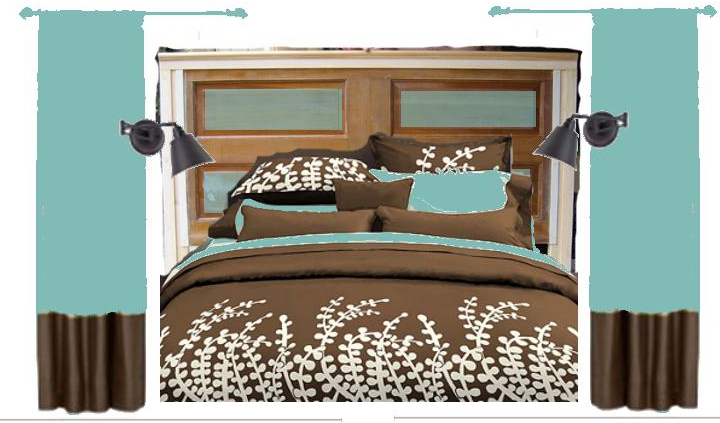
hanks to potterybarn.com and Gimp, we've been able to cobble together an inspiration board of sorts. Pottery Barn has an awesome online tool to help you visually map out your room design. We've created the above layout, switching our queen bed from the western wall to the sourthern wall, and adding in some luxury with a unique floor rug. In Gimp, we were able to play around with color and shape to design a working idea. Here's a list of some of the projects/items/ideas we'd like to pursue:
  • Create a headboard out of re-purposed vintage door
  • Find His & Her gooseneck or adjustable wall-mounted reading lamps for bedside
  • Re-configure closets for more efficient use of storage space
  • Re-finish the old dressers Jay has had since he was a kid
  • Enhance the window to allow for natural light yet still provide privacy
  • Disguise the Goliath-size closet doors
  • Provide me with an intimate and inviting workspace
  • Create a serene, tranquil, and stress-free sleeping environment that uses a canopy of sorts to block out the rest of the room for when we just want to "get away from it all"
My plan is to keep y'all posted with daily updates on our progress. Some of these projects are simple Crafty-Quick-Fixes, while other projects may require several days to reach completion. This adventure Jay and I are about to embark upon will be great practice for when we move to a more permanent and North-Eastern-ly location. Blogging about our triumphs and especially our tribulations will help regulate my perfectionism too!

I'm itchin' to get started! Stayed tuned for many updates to come!

Sunday, June 12, 2011

My Next Chapter: Wifedom

For those of you that haven't heard, I'M MARRIED!!!

We eloped to Austin, Texas and tied the knot on May, 15th, 2011. More details about that in future posts. It's a total DIY wedding and the reception is coming up in July! I'll be posting some fun tutorials and inspiring ideas for all of you future DIY brides!

Also, for those of you that haven't heard, I'm a full-time wife now. I left my position as wedding cake coordinator at a prominent Fox Valley bakery for reasons unrelated to my new title of "wife".

In other news, Jay and I went thrift shopping together as husband and wife for the first time. We stumbled upon a couple of framed vintage prints circa 1911 by Lou Mayer, artist for Puck Magazine. We especially love this one! It's so fitting for us right now! (Click on the photo for a larger view!)
Though things go topsy turvy
And meals they miss a few,
These Newly Wedded Couples
Have other things to do!
I best be off to tackle my massive to-do list for this incredible wedding reception we're planning! There is just owlways something more to do! Ta-ta!

Friday, July 2, 2010

Strawberry Hazelnut Splendor

Just in time for summer picnics and Fourth of July parties! I've doctored the Raspberry Delights recipe from Taste of Home's "Best Summer Desserts 2010" magazine and created a heartier, healthier dessert using whole wheat flour, egg whites and organic strawberry preserve. I've also made the addition of our favorite cream cheese frosting as a rich, flavorful swirl on top.

Variations on this recipe abound! Try any of your favorite fruit preserves or homemade jams for a delicious spin. Combine two or more fruits like strawberry and raspberry for a berry-tastic treat! Experiment with your families favorite nut flavors. Hickory nuts, walnuts, almonds, even sans nuts could all enhance the flavor of this cookie bar! I know I'll be trying a butter streusel topping sprinkled over the next Strawberry Hazelnut Splendor I make for my family!

Strawberry Hazelnut Splendor

Ingredients:
1 c Butter, softened
1 c Sugar
2 Eggs, egg-whites only
1/2 c Whole Wheat Flour
1 1/2 c All Purpose Flour
1 c chopped Hazelnuts
1 c organic Strawberry Preserve

Directions:
1. Cream butter and sugar in a large bowl until fluffy. Beat in egg whites. Gradually add flours and mix well. Stir in nuts until thoroughly blended.

2. Spread half of the batter into a lightly greased 13x9 baking pan. (Note: Don't be afraid to get your hands dirty! Spreading with your fingers may work easier than with a spatula.) Spread strawberry preserve over the entire surface of the pan. Drop remaining dough over strawberries in small dollops, in a random, haphazard way. Leave random spots of strawberry preserve exposed.

3. Bake at 350 degrees F for 30-35 minutes or until top is golden brown. Let cool. Drizzle with your favorite icing or leave plain. Cut into bars and serve up the splendor!

Monday, June 28, 2010

Crafty Quick Fix: Picture-Perfect Chalkboard

I'm one of those overly-organized people who write everything down lest she forgets. Post-it notes, To-do lists, and magazine clippings can be found all over the house, in my purse, on my fridge, all over my desk... Sometimes those little reminders just aren't enough. They get buried or get lost and you're stuck at the grocery store trying to remember those three silly items you came there to get! This Picture-Perfect Chalkboard helps remedy those pesky situations. Now that quick grocery list stares you in the face every time you walk by this beautiful work of art. It also works as a functional yet funky Family Message Board. Jot a love note to your sweetie, or remind him to take out the trash!

Before:


After:

A
lways on the lookout for ways to re-use thrift store finds, I crafted this simple project out of a $2 frame. After removing the glass, I stripped the varnished and stained wood with this helpful new product I found: Citristrip. According to the manufacturer, this stripping product is safer to use and better for the environment because it lacks the harsh chemicals other strippers depend on. I also personally recommend Citristrip because it's gel form makes simple work out of stripping and provides excellent coverage on raised surfaces like the beveled frame I re-purposed. After two coats of "Aladdin's Wish" paint from Hardware Hank, and a quick coat of chalkboard spray paint from Krylon on a piece of paneling cut to the size of the frame, you're all set to assemble a fabulous new place to jot down your daily reminders!

P.S. Check out my collection of adorable Owl trivets! I just love that vintage charm!

Friday, April 30, 2010

Friday's Feisty Feast: Garden Veggie Pizza


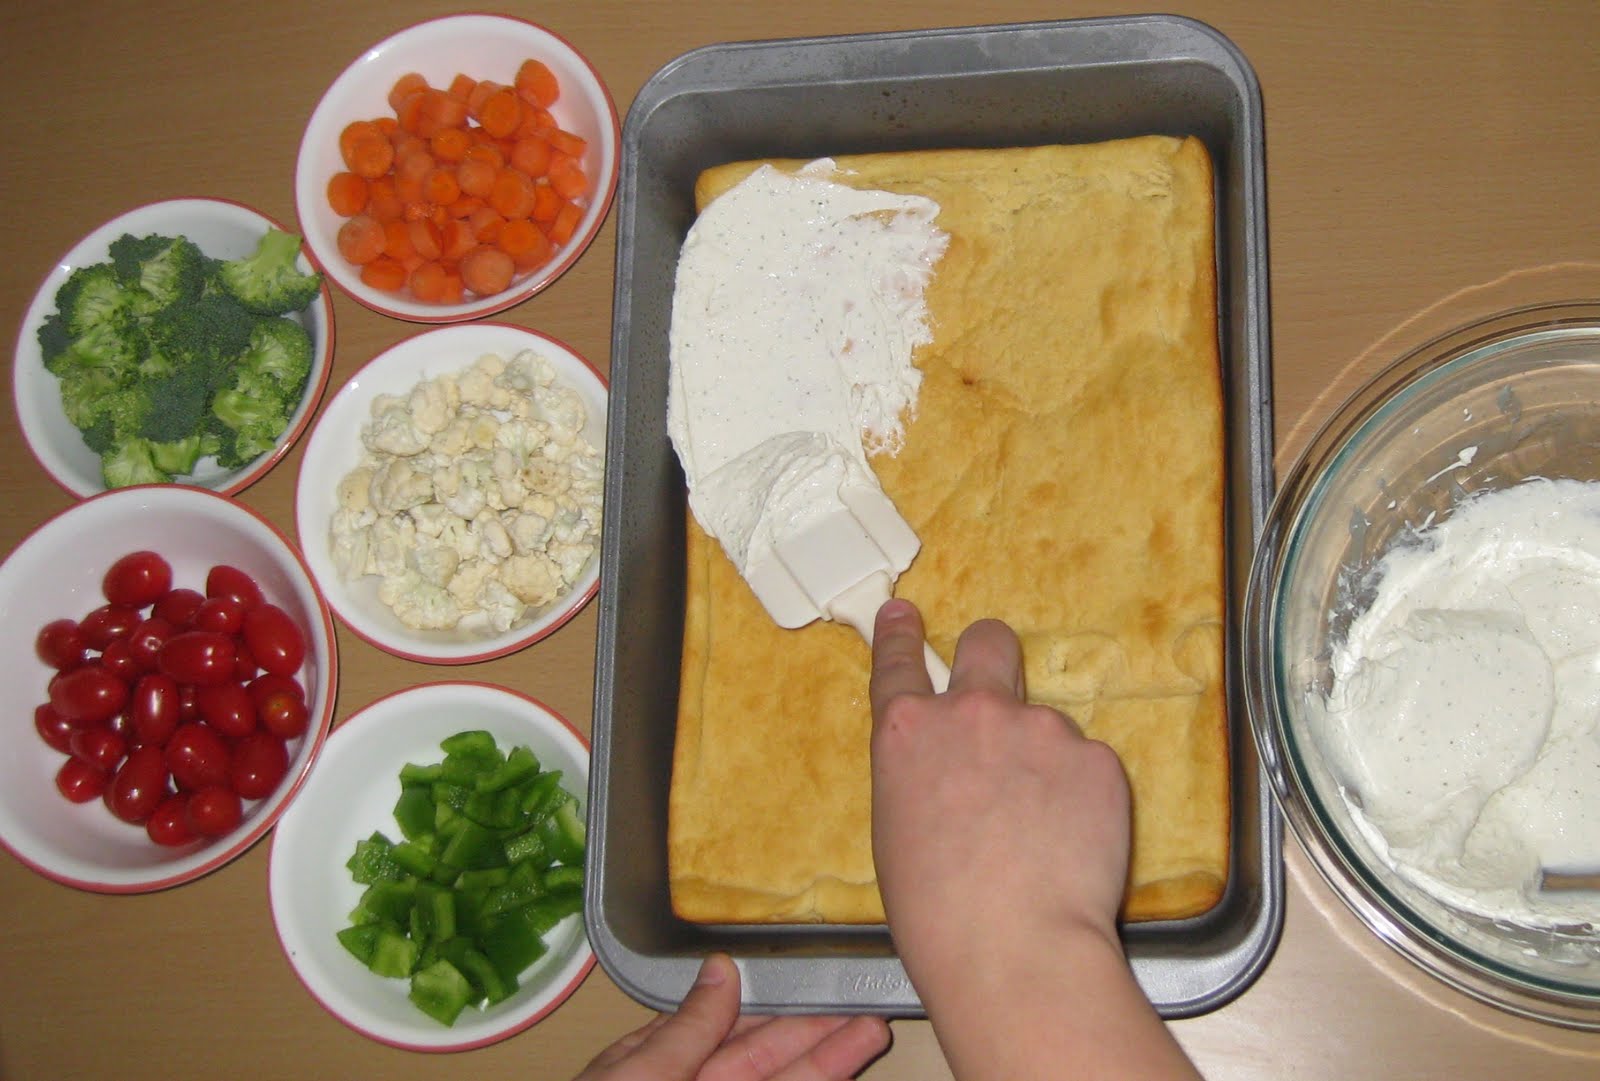
For a healthy luncheon at work, I dug out an enticing recipe I had squirreled away for just such an occasion. After discovering the recipe in Taste of Home's "The Market Fresh Cookbook" edited by Jennifer Olski, I knew this fresh veggie pizza would make a great contribution to a potluck or provide the perfect finger food for a summer picnic or camping trip. This simple recipe was such a hit, I'll be making it every chance I get! Plus, the ingredient list is so versatile, I'll be busy developing new combinations and flavors to try! Look for a Greek-style Veggie Pizza soon!

Garden Veggie Pizza

Ingredients:

8 oz. tube seamless Crescent Rolls
8 oz. reduced-fat or fat-free Cream Cheese (Tip: Support local businesses by checking labels to see where your products were produced!)
1 packet of Ranch salad dressing mix
2 Tablespoons fat-free Milk
1/2 cup chopped fresh Broccoli
1/2 cup chopped fresh Cauliflower
1/2 cup chopped fresh Carrots
1/2 cup chopped fresh Green Pepper
1 small package Grape Tomatoes

Directions:

Preheat oven to 375 degrees F. Unroll crescent dough into 13x9x2 inch baking pan, coated with nonstick cooking spray. Bake for 11-13 minutes or until golden brown. Check for air bubbles during the baking processing and pierce any with a fork. Remove from oven and allow to cool completely.

Meanwhile, wash and chop all of your veggies. Grape tomatoes should remain whole. Set aside.

In a small mixing bowl, beat cheese, dressing mix, and milk until a smooth consistency is reached. Spread over cooled crust. (Tip: Extra ranch cream cheese spread makes for an indulgent dip for any leftover veggies you may have!)

Sprinkle cheese-coated crust with chopped veggies. Cover and refrigerate before serving. Slice with a pizza cutter and enjoy!

Friday, April 16, 2010

After a manic match of mayhem on the roller derby track, it's nice to come home to some awesome pain and stress relief. As a gift, I made these therapeutic rice bags for my boyfriend's sister, Mistress Miter Saw, a sassy and spunky member of the Fox Cityz Foxz and reigning British World Champion of Pillow Fights. When she's not kicking butt, she's kicking back and using these punkified rice bags to relax those derby-inspired aches and pains away.

Using the same modified pattern I borrowed from Sew, Mama, Sew for the October 2nd, 2009 post Crafting for a Cause: Cool Rice Therapy Bags, I opted rocker chic fabric for this rocker chick and incorporated punk princess pink accents. (Reduce, Reuse, Recycle Alert: Notice the scraps from the quilt I made last summer!) I also made a matching soothing eye mask using a soft pink fleece liner whip-stitched with pink embroidery floss. You can find a template pattern for such an eye mask here.

Whether you're recovering from a day of body slams and elbow jabs on the fierce derby track, or you're just struggling with the everyday aches and pains of a life on the go, these therapeutic rice bags offer soothing comfort and make a great gift for the roller derby princess in your life!

Check out the Women's Flat Track Derby Association on how you can locate, join, or support a local derby in your area!

Wednesday, April 14, 2010

Design Medley: Retro Teal & Olive


Nothing shouts retro 70's mod design louder than the color scheme of teal blue and olive green. (Well, maybe vivid orange and bold brown do, but we'll save that for another design medley post!) Just picture the 1970's wallpaper in your parents' kitchen, or the old avocado green Frigidaire rattling along in your basement. Now anchored by a supporting cast of creamy white and recycled brown, these vintage colors take on a bold new meaning. Check out some of the whimsical cards inspired by this design medley!

Up top, an edgy yet simple thank-you card uses mixed textures to showcase the versatility of these colors. The raggedness of the distressed olive background is balanced by the delicate smoothness of the woven teal ribbon on the left. Yet the raggedness and distressed-look of this card is reestablished by the unraveling fringed fabric of the center teal blue "thank you" motif. A satin ribbon flower continues the unconventionality of this card in an unexpected color.

The card at the right uses an awkward pre-fab card as it's base. Blue argyle paper and unique green ribbon architecturally divide the bubbly space of this card. A floral medallion of paper, felt, and mesh in browns, golds, and greens is fused together with a retro, square blue brad. Separate, these design elements would strain the eye and be considered unattractive. But together they form an alluring montage that draws the eye in and encourages the eye to explore and appreciate the colors, shapes, and textures as a whole. (Am I starting to sound like a freakin' art critic or what?!?!) Bottom line: DON'T be scared of making something ugly. The results just might surprise you!

This final card is my favorite from the group. It is pure whimsy. Designed to celebrate an engagement, a wedding, or an anniversary, this card ignores conventional elegance and drastically re-writes the rules on "pretty". Teal blue and olive green elements explode all over this card. Buttons, embroidery floss, fabric, ink, ribbon, and bejeweled charms scatter across the page in a billowing display of retro opulence and distressed home-made enchantment. Delightful!

P.S. I practiced some of my photo editing and image design on GIMP for this post. That's where all the overlaid flourishes and graphic embellishments came from. Hope you like it!

Friday, April 9, 2010

Friday's Feisty Feast: Spring Asparagus Medley

Spring has arrived with its sudden rain showers, blooming daffodils, and tasty asparagus! Here's my asparagus-inspired adaptation of a recipe from the book "The Little Guides: Pasta" copyright 1999. The crisp, green of the fresh asparagus in my version makes for a grand splash of color next to the vibrant red tomatoes and pimento. The original recipe uses scallops and Penne, but Gemelli pasta and asparagus gives this dish a nice twist. Enjoy!

Spring Asparagus Medley with Pasta


Ingredients:
1 lb. fresh Asparagus
8 oz. Gemelli or other dried pasta
4 tsp. minced Garlic (We love Christopher Ranch!)
2 T Olive Oil
½ c. Red Cooking Wine
2 tsp. Cornstarch
2 lb. Roma Tomatoes, finely chopped
4 oz. diced Pimento (Check your grocer’s condiment aisle!)
3 T dried Italian Seasoning
½ tsp Salt
¼ tsp crushed Red Pepper flakes
Topping: grated Parmesan cheese (optional)

Directions:
Prepare pasta according to package directions. Cook to al dente. Drain.

Prepare asparagus. Bring a large saucepan of water to boil. Meanwhile, snap off woody base of asparagus and discard. Slice into 1 1/2 inch pieces. Add asparagus to boiling water for 8-10 minutes or until tender. Remove from heat and drain.

In a large frying pan or stove top wok, mix together red cooking wine and cornstarch. Add in asparagus, minced garlic, chopped tomatoes, diced pimento, Italian seasoning, salt, and red pepper flakes. Cook on medium heat until bubbles start to form and mixture has thickened in texture. Reduce heat to low for 5 minutes. Toss in cooked pasta until well mixed. Serve immediately and top with grated Parmesan cheese if desired. Serves 4.

Friday, October 23, 2009

Serging Ahead!

As if I didn't have a long enough list of craft projects and new ideas waiting to be explored, I had to stumble upon a new toy!

Purchased from Goodwill for only $39.99, I knew it was a gamble. But with Goodwill's 10 Day return policy for electronics, I knew it was a sure bet to pick up this Simplicity Easy Lock Serger and give it a whirl. After finding a PDF of the owner's manual online, I knew I was in great shape! All of the original accessories were included (rare!), plus four full cones of black thread - that's $15 in savings right there! After 45 minutes of using the manual to learn how to thread the darn thing, and another 15 minutes adjusting the various thread tensions and stitch lengths, I was finally in business!

Now, I was under the impression machines were invented to make life easier for humans. My new Simplicity Easy Lock Serger does just that - it enhances simple projects and simplifies certain tasks. But on the other hand, a whole mew world of crafting and sewing possibilities open up for me, making my life anything but easier!

I'm eager to try some of the fab ideas in "Ready, Set, Serge!" by Georgie Melot. Check back to see just how I put my new toy to use!

Wednesday, October 21, 2009

Owl of the Week: Saw-Whet Owl 83163


Title: 83163

Banded: October 10, 2009

Adopted:
October 17, 2009

Gender: Male

Location: Banded and Released at Woodland Dunes Nature Preserve in Two Rivers, WI

Unique Characteristic(s): At this year's annual Owlfest at Woodland Dunes, we had the very unique opportunity to learn about and interact with Saw-Whet Owls. These breath-taking creatures were the star attractions at this fund-raising event. For a small donation, we were even able to "adopt" one of these captivating creatures. We'll be able to track his progress if he's ever captured and released again!

Tuesday, October 20, 2009

More Gourd-geous Designs: Halloween 2009

Check out our two carved beauties we did up for the annual Halloween party!

Pumpkin on the left uses another idea from The Best of Martha Stewart Living: Halloween to create a starry, magical glow. Small round holes are punched over the entirety of the gutted pumpkin. We used a screwdriver. A larger hole is punched unobtrusively in the backside of the gourd, near the base. White Christmas lights are strung through that base hole, and are then individually inserted into each punched hole. Left over lights on the strand easily fit in the center of the hollow pumpkin, enhancing its warm glow. Small hands work best in the confined space, so get the kids to gently assist you on this one. Icicle lights work just as well as single stranded lights do. On a medium sized pumpkin, we punched 50 holes and used a 100 light set.

Our other gourd-geous pumpkin was created by doctoring a clip-art image to suit our needs. This handsome little owl was found doing an image search. It's best to use images with simple lines, few details, and using 2-3 colors in its design. That way, its easier to mark on the image what design elements are cut away and what design elements are formed by the pumpkin itself. We also utilized a linoleum cutter to shave away bits of the pumpkin to emphasize the overall shape and outline of the owl, without having to make intricate slices. If by chance you do cut out an element, say an eye, but want to add back in detail, say an iris/pupil, bamboo skewers work wonders at holding pumpkin chunks in place. Plus, they're relatively unnoticeable!


Hope this gives you a little inspiration to enhance your pumpkin carving. I'm already gathering new ideas for myself...

N
ext year i just may have to try these little guys!

Friday, October 16, 2009

Friday's Feisty Feast: Roasted Pumpkin Seeds


We get into the festive Halloween spirit with quite a flourish around here! I'm always eager to stumble upon new holiday decorating ideas and new holiday recipes. Today's blog post rolls them both into one!

Browsing the craft section of my local library, I came across The Best of Martha Stewart Living: Halloween. I was very inspired by several of her ideas and used them to carve a few pumpkins for the annual Halloween party we attend. More photos coming soon! We scoured local hardware stores and big-box chain stores for the perfect tool to make 1" round holes in our first pumpkin (see above). Don't waster your time doing the same. Nobody could help us with our carving supply needs. But as luck would have it, we had access to old metal wind chime pipes. This worked far better than expected and produced smooth, round results! A large Phillips screwdriver punched smaller star-shaped holes for a glittery effect around the larger holes. It was gourd-geous! (Get it? Gourd-geous instead of gorgeous? Very punny...)

It's practically holiday law that you can't play surgeon to a pumpkin without properly attending to his innards. That's where today's recipe comes in. Roasting pumpkin seeds makes a great snack, is the perfect addition to home-made trail mix, and is popular with all the boys and ghouls at holiday parties!

Traditional Roasted Pumpkin Seeds

Ingredients:
1-2 cups fresh Pumpkin Seeds
Olive Oil Cooking Spray
Salt to taste (Sea Salt works great!)

Directions:
Clean pumpkin seeds with water. Easy method: Throw seeds into a large colander and rinse off in the sink. Preheat oven to 300 degrees Fahrenheit. Line a baking sheet with parchment and spray with olive oil cooking spray. Add the pumpkin seeds in a single layer and coat with another layer of olive oil cooking spray. Season with salt to taste. Bake in oven for 30-45 minutes, until golden brown. Remove from oven, let cool, and enjoy!

Go Un-traditional! Try some of these exciting twists on this traditional recipe. (Tip:Olive oil or olive oil cooking spray may be used in place of butter in any of these recipes.)

Wednesday, October 14, 2009

Owl of the Week: Dirk the Dutch Style Owl

Title: Dirk the Dutch Style Owl

Adopted:
Late Summer 2009

Material:
Ceramic glazed in Dutch blue, light brown, black, and green over an unglazed grey clay

Size:
5 inches tall

Location:
Currently adding whimsy and charm to our bookshelves

Unique Characteristic(s):
Painted in a style reminiscent of one made popular in 19th Century Dutch Potteries, this colorful and bold bird aptly needed a Dutch name.


Tuesday, October 13, 2009

Idea Journal = Instant Inspiration

If you're anything like me, you read a magazine or browse a catalog and inevitably find tons of inspiring projects or home decor ideas you'd love to try someday. You tear out or photocopy the items or articles you like the most and squirrel them away in random places around the house. Or even worse, you save the entire catalog or magazine in fear of besmirching it's integrity and the inspiration it contains.

Stop all of that silly nonsense and buy yourself a blank journal. I prefer the orderliness of a lined journal, but get yourself whatever is most functional for you. Gather up all of those random clippings and copies and determine any major themes among them. For me, it's Home Decor Ideas, Holidays, Special Occasions, and Gift Ideas, but for you it could be more specific like Color Ideas and Fabric Samples for the Living Room or Garden Tips or Anniversary Vacation Destinations. Now make tabs for each of your categories by placing same-shaped stickers back-to-back on the edge of a journal page. Space these tabs out throughout your journal and evenly down the side edge of the journal.


Now start pasting in your fabulous articles and pictures, leaving plenty of room to jot down notes. Record your initial reactions or ideas on how to take the project and make it better with your own special touches. And no need to do this all in one day. I continually add to my Idea Journal and use long car rides to do any of the note jotting I need to do.

This is a great way to always have ideas at the ready and to keep control on that inescapable creative clutter!